If you've stuck with me this far, you're familiar with the overall strategy for fabricating the HAPP's outer aeroshell: Make the plug, then the mold, and finally the part. Well, after perhaps 250 hours of study, experimentation, failures, and troubleshooting, here we are at last at the part-making stage. Let's get busy.
First, let's start with the end in mind. Below is a picture of the part we're making - the lower aero shell. Recall that the HAPP is essentially a scale model of the Apollo Command Module. The lower aero shell is analogous to the lower heat shield on the Command Module. Of course, the HAPP will not experience the blow-torch heat that the CM felt upon reentry at Mach 32, but we desire aerodynamic stability at supersonic and trans-sonic speeds, and the Apollo design achieves this. (Interesting technical footnote: Blunt shapes experience less heating upon reentry compared with pointy shapes. This was a military secret until NACA, the predecessor of NASA, finally published it in 1958. Read it here.)
If you just came here for a sexy picture of the finished product then you're done. See you next post. If you care to see how the sausage is made then proceed!
OK so here we go. Below are two pics from my first attempt at the full-scale finished part. The left frame shows the beginning of resin infusion - recall that we're using the vacuum infusion process I described previously. The portion that's been wetted by resin is darker than the surrounding material.
The right frame shows the "finished" part - a total disaster! The resin did not thoroughly infuse around the part, and there was a lot of raw fiber that I had to cut away. You can still see loose fiber around the edges. In addition, the layup consisted of only two layers of fabric, and it did not provide sufficient rigidity. The part is quite floppy and feels a bit like leather. Very expensive and useless carbon fiber leather, that is...
So onward to trial #2 with lessons learned.
The first process improvement involved the PVA. Recall that this is a non-stick coating sprayed onto the mold surface so the layup and resin don't adhere to the mold. In trial #1 the PVA pooled in the bottom of the mold. In trial #2 I drilled a drain hole and let the excess PVA flow out. This resulted in a highly uniform coating inside the mold.
Next came the layup. The main improvement over trial #1 was to add a third layer of fiber and an intermediate layer of Lantor Soric foam core. This improved layup was developed in the previous post.
Here's a view of the first three layers. I trimmed the excess overhanging material before bagging and infusion.
For the outlet port I wrapped a spiral plastic tube with permeable nylon peel ply, ran it around the lip of the mold, and connected it to the vacuum pump. This provided an even vacuum draw all around the part.
Next I placed the entire mold in a vacuum bag and affixed the inlet ports. For the bagging material I used a very elastic sheeting called Stretchlon 200. And below you can see the final major improvement versus trial #1 - the addition of more inlet ports. This allowed for faster resin flow and more even coverage around the part.
At last it was time to infuse. After activating the vacuum pump I opened the resin valves and established an even flow. Below is a short video that gives you a sense of the flow speed. This is 3/4" outer diameter plastic tubing. In the future I will eliminate the bubbles by de-gassing the resin in a vacuum tank prior to infusion. For this first aeroshield, which will be sacrificed in flight testing, the bubbles won't affect the final part significantly.
With the additional resin inlet ports, infusion progressed evenly and quickly.
I also discovered that the infusion ports needed constant support. With the help of a friend (thanks John!) we quickly improvised the support "lattice" shown below. In future builds we'll use an actual lattice.
Infusion: Done. Resin cure: Done. Now it was time to decant the mold from the vacuum bag. It was a little tedious and some helping hands made for fast work.
Below is the decanted part and a close up of the B-surface. Remember that the B-surface is not normally visible and its appearance is not critical. Nevertheless, the surface doesn't look too bad. You can clearly see the imprint of the red flow media that sat on top of the layup.
Finally, after a couple of hundred hours of learning and failures, it was time for the coup de grace: De-molding of the finished part. That's me in the left frame below with a big smile on my face because the part looks good. John is holding the part in the center frame with half of the mold removed. The right frame shows the part and A-surface in all its Kevlar glory.
This picture says it all. Success!
Here's a view of the part being rotated so you can get a better sense of the shape and dimensions. There are a few tasks for later - Trim the edges, fill in a few minor defects, and polish the outer A-surface.
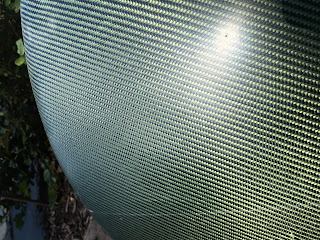
And here's some of the A-surface detail. Kevlar, beautiful Kevlar... the mold parting line is clearly visible in this picture. I will sand it out and polish later.
Here's the lower shield in the approximate position it will maintain on the HAPP. I'll do a post about the mounting system later. There is an upper aeroshell as well - pics to follow soon.
And once again, here's the finished part. I essentially spent the entire summer learning to fabricate an aerospace-quality composite aeroshield. It was far more work than I expected, but it was a fantastic learning experience and the part turned out better than I expected.
During this final trial (#2) I noted many process refinements for future production runs. My friend John provided many of the more useful observations and ideas. There are also a few small quality issues with the part that need to be ironed out but the process refinements should fix them.
Undoubtedly I will make a few more parts in the future as we test & destroy before the first mission flight. With some luck, the process will only get easier and the parts will be even higher quality.
Onward!
First, let's start with the end in mind. Below is a picture of the part we're making - the lower aero shell. Recall that the HAPP is essentially a scale model of the Apollo Command Module. The lower aero shell is analogous to the lower heat shield on the Command Module. Of course, the HAPP will not experience the blow-torch heat that the CM felt upon reentry at Mach 32, but we desire aerodynamic stability at supersonic and trans-sonic speeds, and the Apollo design achieves this. (Interesting technical footnote: Blunt shapes experience less heating upon reentry compared with pointy shapes. This was a military secret until NACA, the predecessor of NASA, finally published it in 1958. Read it here.)
If you just came here for a sexy picture of the finished product then you're done. See you next post. If you care to see how the sausage is made then proceed!
 |
| Finished lower aeroshell. Mold parting line is visible and will be sanded out and polished. This part is 1 meter in diameter. |
 |
| Lookin' like a BOSS with that Kevlar/carbon fiber weave on the A-surface |
OK so here we go. Below are two pics from my first attempt at the full-scale finished part. The left frame shows the beginning of resin infusion - recall that we're using the vacuum infusion process I described previously. The portion that's been wetted by resin is darker than the surrounding material.
The right frame shows the "finished" part - a total disaster! The resin did not thoroughly infuse around the part, and there was a lot of raw fiber that I had to cut away. You can still see loose fiber around the edges. In addition, the layup consisted of only two layers of fabric, and it did not provide sufficient rigidity. The part is quite floppy and feels a bit like leather. Very expensive and useless carbon fiber leather, that is...
 |
| Trial #1: Total failure! |
So onward to trial #2 with lessons learned.
The first process improvement involved the PVA. Recall that this is a non-stick coating sprayed onto the mold surface so the layup and resin don't adhere to the mold. In trial #1 the PVA pooled in the bottom of the mold. In trial #2 I drilled a drain hole and let the excess PVA flow out. This resulted in a highly uniform coating inside the mold.
 |
| PVA drip hole and uniformly-coated mold. Mold legs were amputated to facilitate covering the entire mold with the vacuum bag. Easy come, easy go. |
Next came the layup. The main improvement over trial #1 was to add a third layer of fiber and an intermediate layer of Lantor Soric foam core. This improved layup was developed in the previous post.
 |
| Clockwise from top left: Kevlar A-surface layer; 3K carbon twill; Lantor Soric foam core; 3K carbon plain weave B-surface. |
Here's a view of the first three layers. I trimmed the excess overhanging material before bagging and infusion.
 |
| Working on the layup |
For the outlet port I wrapped a spiral plastic tube with permeable nylon peel ply, ran it around the lip of the mold, and connected it to the vacuum pump. This provided an even vacuum draw all around the part.
 |
| Nylon-wrapped spiral tubing (green) on mold lip. |
Next I placed the entire mold in a vacuum bag and affixed the inlet ports. For the bagging material I used a very elastic sheeting called Stretchlon 200. And below you can see the final major improvement versus trial #1 - the addition of more inlet ports. This allowed for faster resin flow and more even coverage around the part.
 |
| 4 resin inlet ports |
At last it was time to infuse. After activating the vacuum pump I opened the resin valves and established an even flow. Below is a short video that gives you a sense of the flow speed. This is 3/4" outer diameter plastic tubing. In the future I will eliminate the bubbles by de-gassing the resin in a vacuum tank prior to infusion. For this first aeroshield, which will be sacrificed in flight testing, the bubbles won't affect the final part significantly.
With the additional resin inlet ports, infusion progressed evenly and quickly.
 |
| Infusion progress |
I also discovered that the infusion ports needed constant support. With the help of a friend (thanks John!) we quickly improvised the support "lattice" shown below. In future builds we'll use an actual lattice.
 |
| Resin feed tubes clamped in place |
Infusion: Done. Resin cure: Done. Now it was time to decant the mold from the vacuum bag. It was a little tedious and some helping hands made for fast work.
 |
| Decanting from the vacuum bag. Chunks of red flow media are visible. |
Below is the decanted part and a close up of the B-surface. Remember that the B-surface is not normally visible and its appearance is not critical. Nevertheless, the surface doesn't look too bad. You can clearly see the imprint of the red flow media that sat on top of the layup.
 |
| B-surface detail |
Finally, after a couple of hundred hours of learning and failures, it was time for the coup de grace: De-molding of the finished part. That's me in the left frame below with a big smile on my face because the part looks good. John is holding the part in the center frame with half of the mold removed. The right frame shows the part and A-surface in all its Kevlar glory.
 |
| De-molding the part |
This picture says it all. Success!
 |
| Thanks for helping, John! |
Here's a view of the part being rotated so you can get a better sense of the shape and dimensions. There are a few tasks for later - Trim the edges, fill in a few minor defects, and polish the outer A-surface.
And here's some of the A-surface detail. Kevlar, beautiful Kevlar... the mold parting line is clearly visible in this picture. I will sand it out and polish later.

 |
| A-surface detail |
 |
| The lower shell goes here |
And once again, here's the finished part. I essentially spent the entire summer learning to fabricate an aerospace-quality composite aeroshield. It was far more work than I expected, but it was a fantastic learning experience and the part turned out better than I expected.
 |
| Aeroshell... beast mode |
During this final trial (#2) I noted many process refinements for future production runs. My friend John provided many of the more useful observations and ideas. There are also a few small quality issues with the part that need to be ironed out but the process refinements should fix them.
Undoubtedly I will make a few more parts in the future as we test & destroy before the first mission flight. With some luck, the process will only get easier and the parts will be even higher quality.
Onward!
No comments:
Post a Comment